Using the eClaims eService
Depending on your configuration you will either have eClaims advanced access or to eClaims public access.
-
If you see menu options at the top of the screen, you have advanced access: you can Create a claim using the advanced access and you can Search for claims and edit them using the advanced access.
-
If you do not see any menu options at the top of the screen, then you have public access: you can Create a claim using the public access.
Watch the video for an introduction to claim creation with eClaims.
Then follow the step-by-step instructions below.

-
Open "Create Claim" tab
-
Select company, if needed
If your company has several SAP accounts, select the correct one from the list. Correct fields as necessary.
-
Click the "Next" button
-
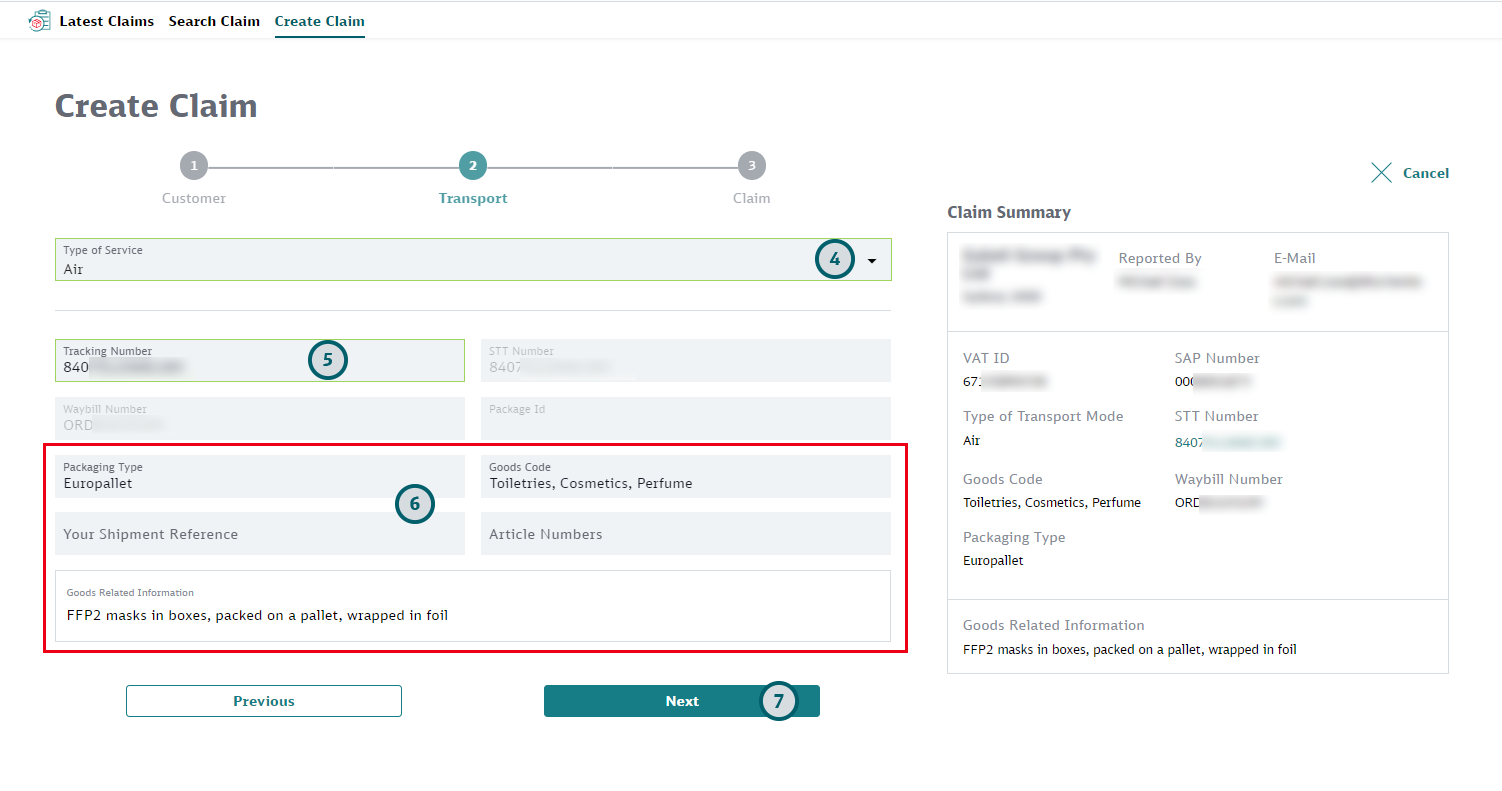
Select the Service Type of the shipment for which you want to raise a claim
-
Enter Tracking Number of the shipment
This is the number Schenker has provided for this shipment. It can be the STT number, a Waybill Number, or a Package ID. You can only register one claim for each tracking number.
-
Enter goods related details of the shipment
Include all information that is relevant for processing the claim. For example, include a description of the goods and how the goods were packed.
-
Click the "Next" button

-
Enter Claim related details
Make sure to enter all relevant claim details. -
Upload supporting documents
You can drag-and-drop your files into the field, or you can click the "Upload a File" button and search for the document you want to upload.
-
Check claim details
Make sure to check all details before you submit your claim.
-
Click the "Submit" button
You will now be able to see the claim in the "Latest Claims" tab.
-
To see the 20 latest claims open "Latest Claims" tab
Here you will see the 20 latest claims in chronological order.
-
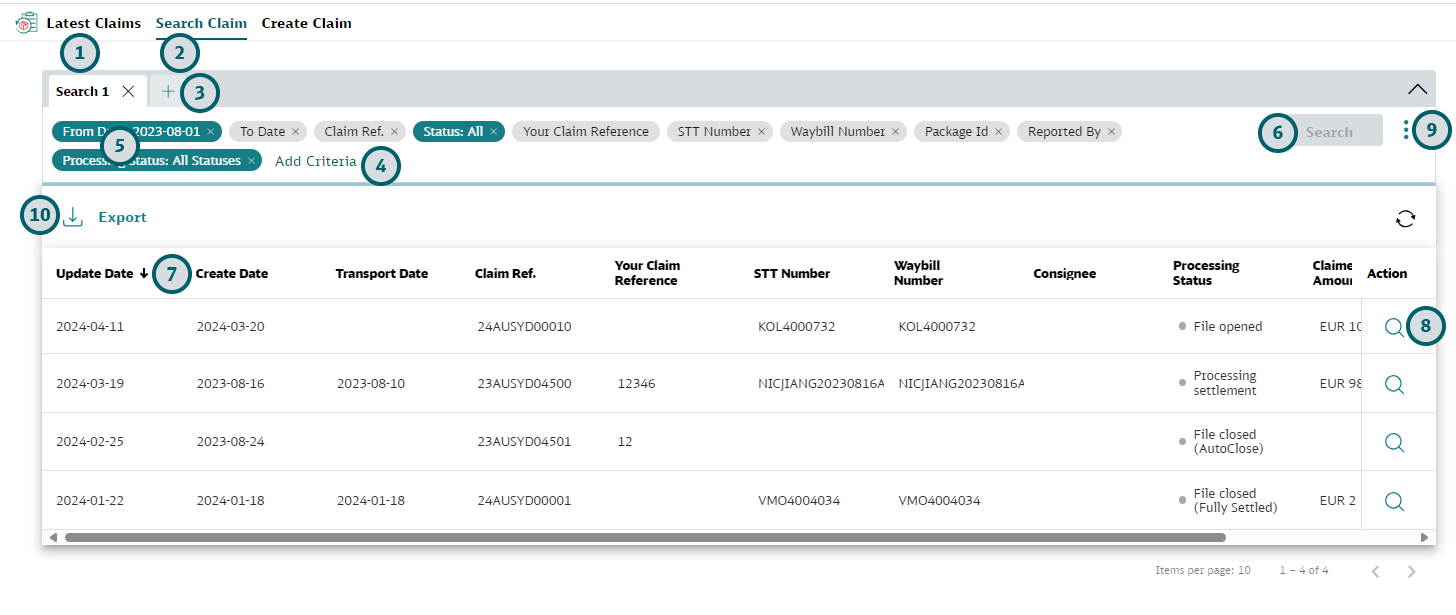
For a more complex search, open the "Search Claim" tab
This tab will allow you to define search criteria according to your needs.
-
Open a new search tab to start a new search
Click "+" to start a new search. You can also adjust an existing search shown in one of the tabs.
-
Select search criteria
Some search criteria are defaulted for a new search. Use "X" to deselect a criterion that you do not need. Click "Add Criteria" to select additional search criteria as needed.
-
Enter Search Criteria
Click on each criterion and enter / select the value(s) for your search.
-
Start Search
When you click the “Search” button, the system will retrieve all claims that fit the defined criteria. The search results will be shown at the bottom at the screen.
-
Sort claims according to your needs
Hover over the column titles. Click on the arrows to sort the search results according to your needs.
-
Check details of a claim and edit it
The overall status of the claim can be seen in the "Processing Status" column. To see all details of the claim click on the claims details
 icon. If needed, you can send additional information via e-mail or by adding an attachment from this screen.
 -
If needed, save your search, open a saved search, reset search values, or adjust visible columns
-
To save a search, click the
 icon and select "Save". Enter a name for your search and save it.
 -
To open a saved search click the
icon and select "Open Saved Search". -
To reset the values you have entered for the selected search criteria, click the
icon and select "Reset form". -
To change the columns that are visible on screen, click the
icon and select "Customize columns". In the pop-up use the arrow icons to move the columns you want to see to the "Selection" side, and the columns you do not want to see to the "Choices" side. Click the "Apply" button to save your changes.
-
-
If needed, export the search results
Click the
 icon to start the download of an Excel file.
-
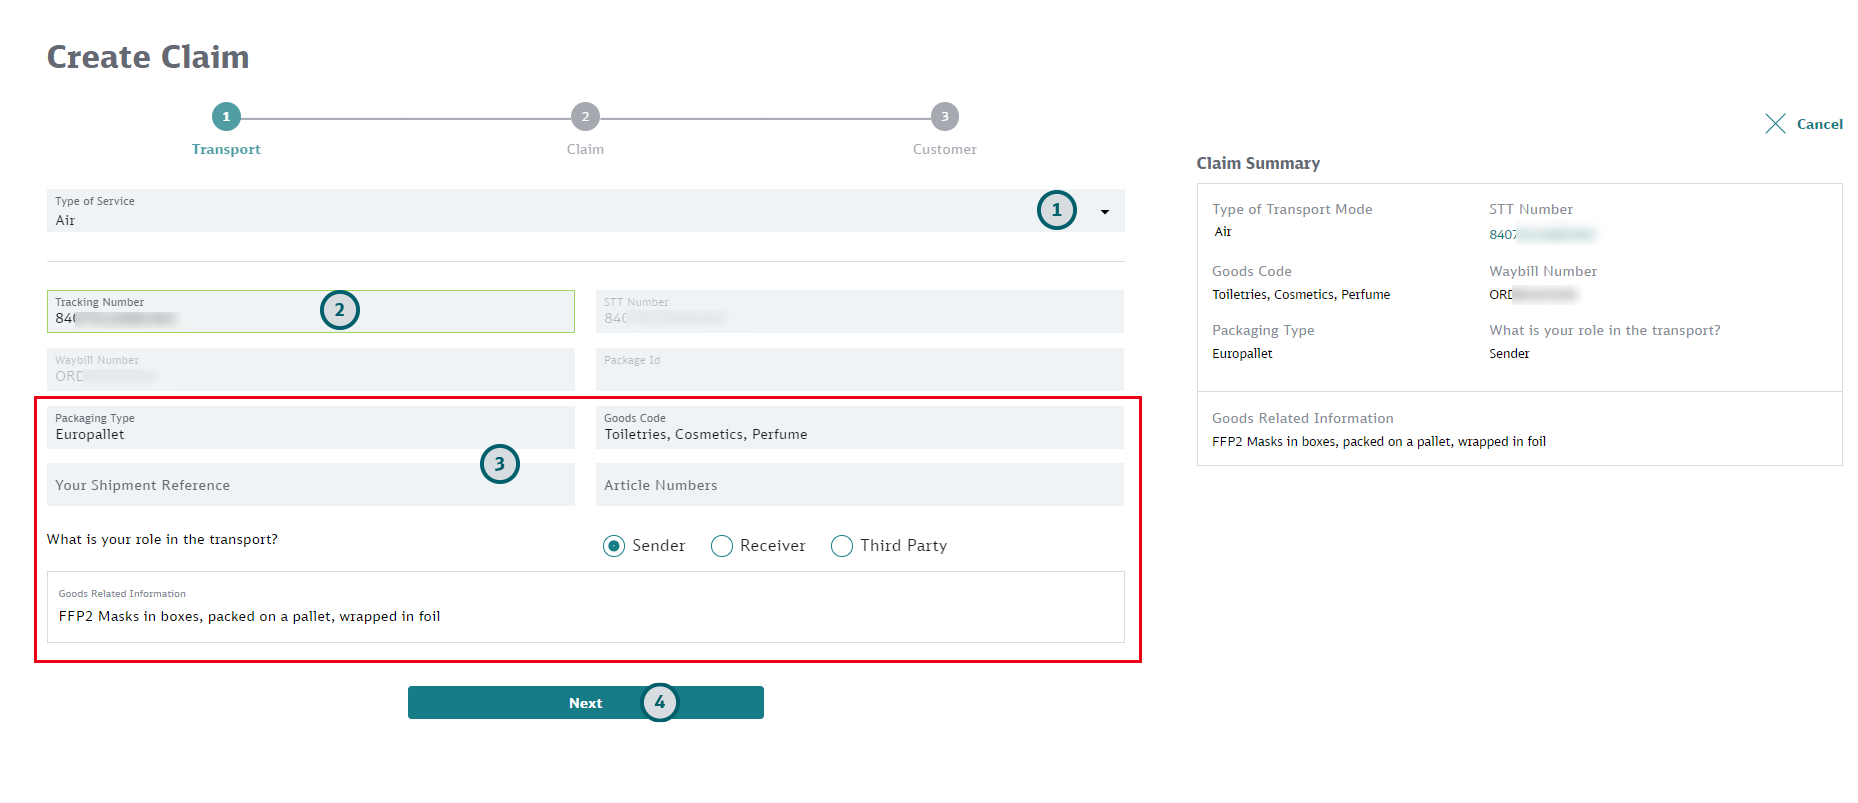
Select the Service Type of the shipment for which you want to raise a claim
-
Enter Tracking Number of the shipment
This is the number Schenker has provided for this shipment. It can be the STT number, a Waybill Number, or a Package ID. You can only register one claim for each tracking number.
-
Enter goods related details of the shipment
Include all information that relevant to processing the claim. For example, include a description of the goods and how the goods were packed.
-
Click the "Next" button

-
Enter Claim related details
Make sure to enter all relevant claim details. -
Upload supporting documents
You can drag-and-drop your files into the field, or you can click the "Upload a File" button and search for the document you want to upload.
-
Click the "Next" button
-
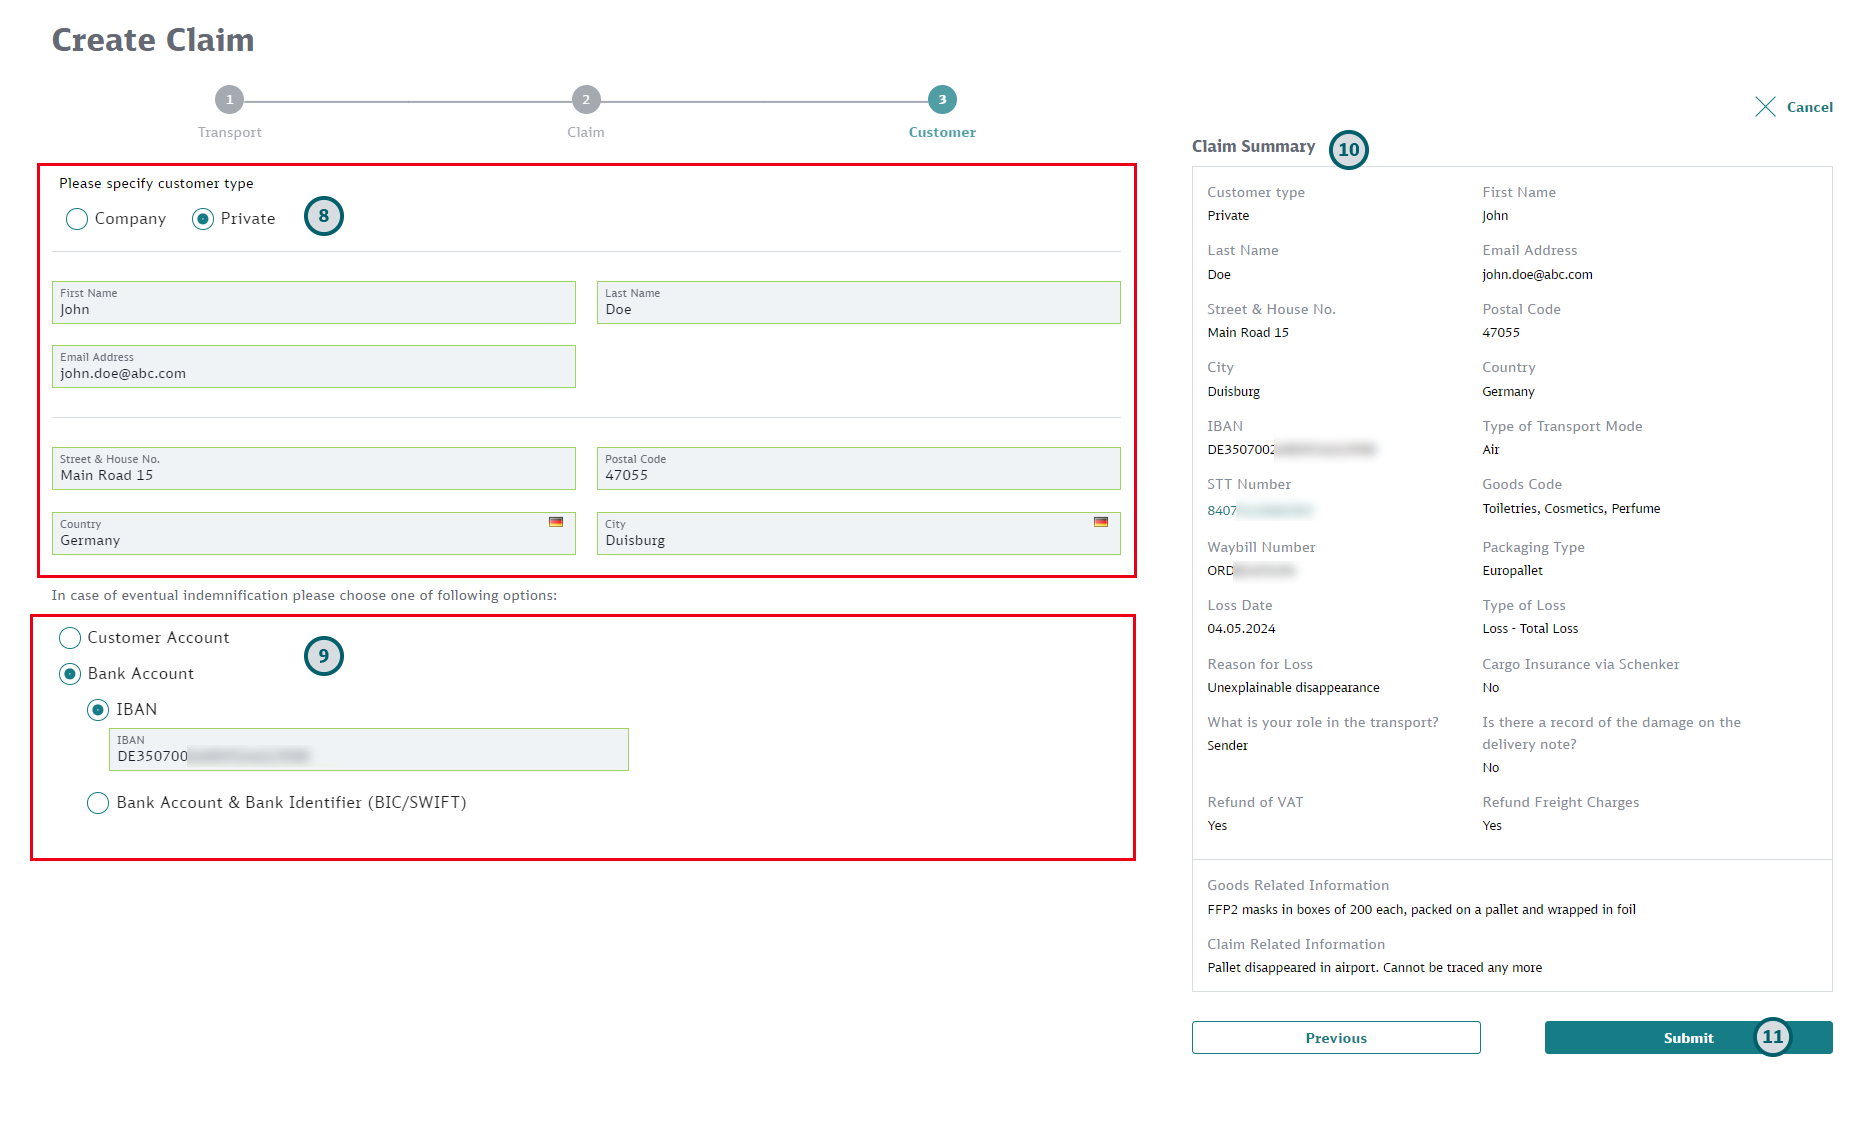
Enter customer details
-
Enter account details
-
Check claim details
Make sure to check all details before you submit your claim.
-
Click the "Submit" button